Once upon a time, I knew nothing about kale. I was curious so I tried making the highly acclaimed kale chips. Not a fan. So I didn't buy kale again. Then I tried it in a soup. Hmmm, better. Then I joined the CSA and I had no choice but to embrace kale with open arms. I now know the difference between the types of kale. I personally like Lacinato better than the curly kind (can you say kale nerd?). I've also found several ways to prepare it. Creamed kale evoked cheers from my 6 year-old - same girl that won't eat granola and cries when I serve broccoli. But ok, she cheers for kale. Stranger things have happened.
This salad is fabulous for fall and uses not only kale but also winter squash which is making several appearances in my weekly CSA haul. I chuck the squash in the oven in the morning and then toss everything together in time for lunch. It lasts a couple of days so could be made ahead for an easy peasy lunch.
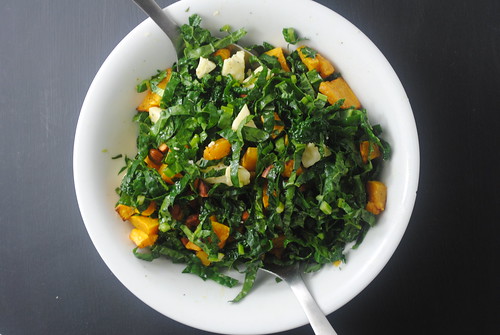
Kale and butternut squash salad
Adapted from Food52 Genius Recipes by Kristen Miglore
Adapted from Food52 Genius Recipes by Kristen Miglore
Ingredients
- 2 cups cubed butternut, kabocha or other winter squash
- Extra virgin olive oil
- Salt and freshly ground black pepper
- 1 bunch kale (preferably lacinato or dinosaur kale), ribs removed and finely sliced, about 4 cups
- 1/2 cup almonds, cut roughly in half
- 1/2 cup crumbled or finely chopped Cabot cloth-bound cheddar (or any good, aged cheddar)
- Fresh lemon juice
- Pecorino or other hard cheese, for shaving (optional)
- Heat oven to 425° F. Toss squash cubes in just enough olive oil to coat, and season with salt and pepper. Spread on a baking sheet (lined with parchment for easier cleanup), leaving space between the cubes. Roast in the oven until tender and caramelized, about 30 minutes, tossing with a spatula every 10-15 minutes.
- Toast the almonds on a baking sheet in the same oven until they start to smell nutty, tossing once, about 10 minutes. Let cool.
- In a large mixing bowl, toss the kale with the almonds, cheddar and squash. Season to taste with lemon juice and olive oil (approximately 1 tablespoon lemon juice and 2 tablespoons olive oil).
- Season to taste with salt and pepper.
- Divide salad between two plates or shallow bowls. Garnish with shaved pecorino cheese, if desired, and serve.